Microservice ile Spring Boot , Eureka ve Load Balancing
Merhaba arkadaşlar ,
Bu örneğimizde mikroservis mimarisi ile euroke server nasıl kurulur ve birden çok aynı servisi deploy edilmiş ise bunun yük dağılımını ayarlamak.
Bildiğiniz üzere mikroservisler ile proje geliştirdiğimizde en büyük sorunu birden çok mikroservisin kontrolü ve bilinirliğidir. Bazı zamanlar servisler o kadar çoğalıyorki bunların konumu hakkında belirsizlik oluşuyor. Bunun önüne geçmek için çözümümüz bütün mikroservislerin konumu ve bilgisini bir tane mikroservise devretmek. Bunu euroka server ile yapacağız.
Bu yazımızda 4 tane mikroservis yazacağız. Birisi euroka server olan “registration-service” sonrasında bu servisimize register olan “product-service” ve “customer service” , en son ise bu servisler arasında yük dağılımı yapan bir servis yazacağız ismi “router” olsun.
Şimdi ilk servisimiz (registration-service) ile başlayalım. Maven projesi açıyoruz ve proje bağımlılıklarımızı xml dosyamıza ekliyoruz. Kod içerisnde gerekli yerlerde yorum satırı eklenmiştir.
pom.xml
|
1 2 3 4 5 6 7 8 9 10 11 12 13 14 15 16 17 18 19 20 21 22 23 24 25 26 27 28 29 30 31 32 33 34 35 36 37 38 39 40 41 42 43 44 45 46 47 48 49 50 51 52 53 54 55 56 57 58 59 60 61 |
<project xsi:schemaLocation="http://maven.apache.org/POM/4.0.0 http://maven.apache.org/xsd/maven-4.0.0.xsd" xmlns="http://maven.apache.org/POM/4.0.0" xmlns:xsi="http://www.w3.org/2001/XMLSchema-instance"> <modelVersion>4.0.0</modelVersion> <groupId>io</groupId> <artifactId>registration-server</artifactId> <version>0.0.1-bilisim.io</version> <packaging>jar</packaging> <name>registration-server</name> <properties> <project.build.sourceEncoding>UTF-8</project.build.sourceEncoding> <java.version>1.8</java.version> </properties> <parent> <groupId>org.springframework.boot</groupId> <artifactId>spring-boot-starter-parent</artifactId> <version>1.5.4.RELEASE</version> <relativePath /> <!-- lookup parent from repository --> </parent> <dependencies> <dependency> <groupId>org.springframework.cloud</groupId> <artifactId>spring-cloud-starter-eureka-server</artifactId> </dependency> <dependency> <groupId>org.springframework.boot</groupId> <artifactId>spring-boot-starter-test</artifactId> <scope>test</scope> </dependency> </dependencies> <dependencyManagement> <dependencies> <dependency> <groupId>org.springframework.cloud</groupId> <artifactId>spring-cloud-dependencies</artifactId> <version>Dalston.SR1</version> <type>pom</type> <scope>import</scope> </dependency> </dependencies> </dependencyManagement> <build> <plugins> <plugin> <groupId>org.springframework.boot</groupId> <artifactId>spring-boot-maven-plugin</artifactId> </plugin> </plugins> </build> </project> |
Servisimizi ayağa kaldırırken sunucu ve servisimiz için gerekli propertyleri ekliyeceğimiz dosyamızı “resources” dizinimize ekleyelim.
application.properties
|
1 |
server.port=8095 |
Sonrasında ise sınıfımızı yazalım .
Application.java
|
1 2 3 4 5 6 7 8 9 10 11 12 13 14 15 16 17 18 19 20 21 22 23 24 |
package io.bilisim; import org.springframework.boot.SpringApplication; import org.springframework.boot.autoconfigure.SpringBootApplication; import org.springframework.cloud.netflix.eureka.server.EnableEurekaServer; /** * bilisim.io * mkilic */ // Spring bize Eureka sunucusu oluşturmayı aşağıdaki notasyonu // kullanarak kolay bir şekilde sunmaktadır. @EnableEurekaServer // springboot projesi @SpringBootApplication public class Application { public static void main( String[] args ) { SpringApplication.run(Application.class, args); } } |
Projemizi ayağa kaldırıp Eureka server ekranına bakalım. Eclipse için Run as > Run Configuration > Maven build > New diyerek çıkan ekranda Goals kısmına spring-boot:run yazarsanız proje sıkıntısız ayağa kalkacaktır veya klasik yöntem yazdıgımız servisi build ettikten sonra target dizinize çıkan jar dosyasına direk java -jar service-ismi.jar yazdığınızda servis ayağa kalkmış oalcaktır.
Servis ayağa kalktığında eureka sunucu ekranı çıktısı şöyle olacaktır.
http://localhost:8095/
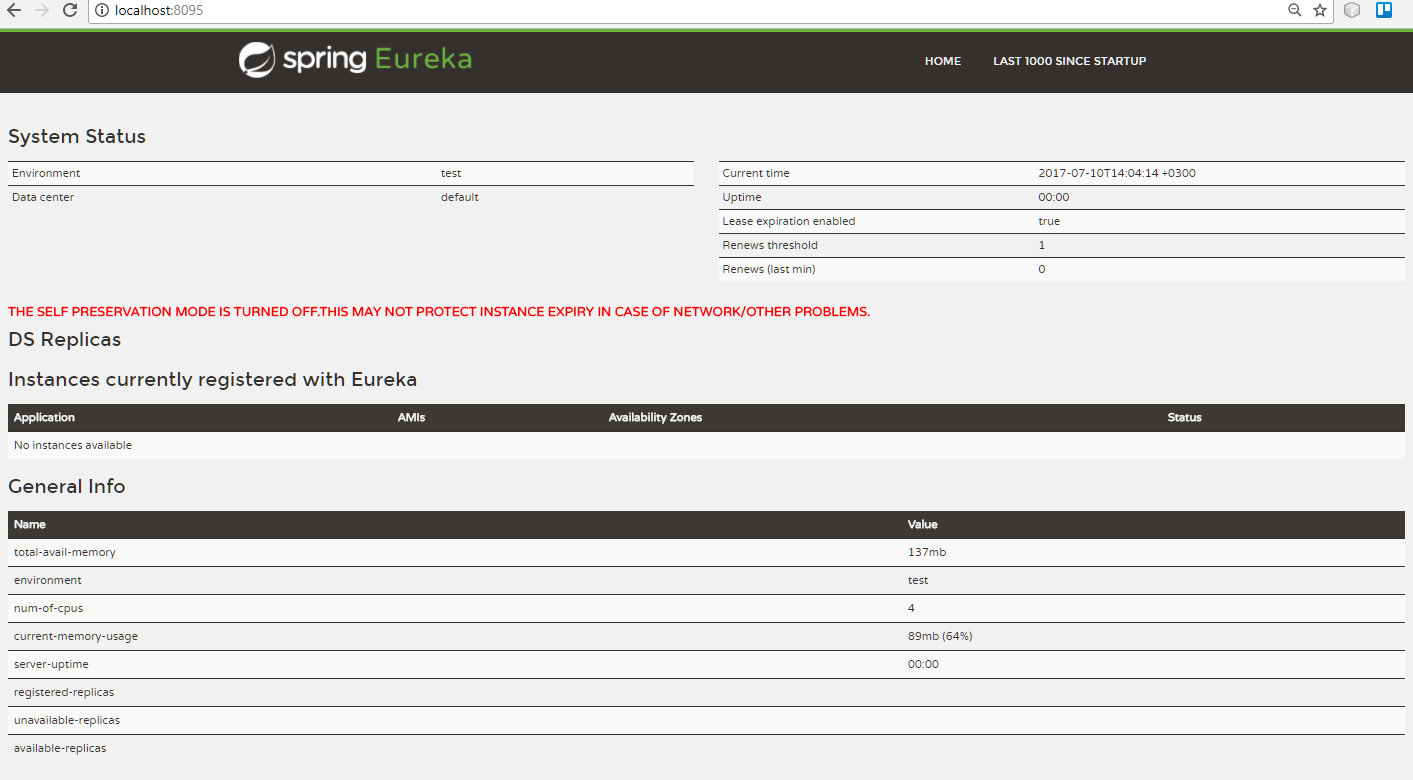
Şimdi ise product-service ve customer-service bu iki servisimizi yazmaya başlayalım.
product-service
Bu servisimiz içinde bir tane end-point olan ve restful servisin bize String bir değer dönecek yük dağılımını test etmemiz için iki kere build alacağımız serviste birinde response olarak “Product Service 1” ikincisinde ise “Product Service 2” dönecektir. Bunun sonucunda servisimize router üzerinden her istek attığımızda yükü eureka server iki servisede eşit olarak dağıtıyormu onu gözlemleyeceğiz.
Maven projesi açıyoruz ve bağımlılıklarımızı ekliyoruz.
pom.xml
|
1 2 3 4 5 6 7 8 9 10 11 12 13 14 15 16 17 18 19 20 21 22 23 24 25 26 27 28 29 30 31 32 33 34 35 36 37 38 39 40 41 42 43 44 45 46 47 48 49 50 51 52 53 54 55 56 57 58 59 60 61 62 63 64 65 66 67 68 69 |
<project xmlns="http://maven.apache.org/POM/4.0.0" xmlns:xsi="http://www.w3.org/2001/XMLSchema-instance" xsi:schemaLocation="http://maven.apache.org/POM/4.0.0 http://maven.apache.org/xsd/maven-4.0.0.xsd"> <modelVersion>4.0.0</modelVersion> <groupId>io</groupId> <artifactId>product-service</artifactId> <version>0.0.1-SNAPSHOT</version> <packaging>jar</packaging> <name>product-service</name> <properties> <project.build.sourceEncoding>UTF-8</project.build.sourceEncoding> <java.version>1.8</java.version> </properties> <parent> <groupId>org.springframework.boot</groupId> <artifactId>spring-boot-starter-parent</artifactId> <version>1.5.4.RELEASE</version> <relativePath /> <!-- lookup parent from repository --> </parent> <dependencies> <dependency> <groupId>org.springframework.cloud</groupId> <artifactId>spring-cloud-starter-eureka</artifactId> </dependency> <dependency> <groupId>org.springframework.boot</groupId> <artifactId>spring-boot-starter-web</artifactId> </dependency> <dependency> <groupId>org.springframework.boot</groupId> <artifactId>spring-boot-starter-test</artifactId> <scope>test</scope> </dependency> <dependency> <groupId>javax.ws.rs</groupId> <artifactId>jsr311-api</artifactId> <version>1.1.1</version> </dependency> </dependencies> <dependencyManagement> <dependencies> <dependency> <groupId>org.springframework.cloud</groupId> <artifactId>spring-cloud-dependencies</artifactId> <version>Dalston.SR1</version> <type>pom</type> <scope>import</scope> </dependency> </dependencies> </dependencyManagement> <build> <plugins> <plugin> <groupId>org.springframework.boot</groupId> <artifactId>spring-boot-maven-plugin</artifactId> </plugin> </plugins> </build> </project> |
Sonrasında servisimizi ayağa kaldırırken sunucu ve servisimiz için gerekli propertyleri ekliyeceğimiz dosyamızı “resources” dizinimize ekleyelim.
application.properties
|
1 2 3 4 5 6 7 8 |
#Unutmayalim servisimiz servis ismi ile register service #register olacaktir spring.application.name=product-service #servis portumuzu yaziyoruz server.port=8099 #Register olabilmeiz için eureka url'imizi veriyoruz. eureka.client.serviceUrl.defaultZone=${EUREKA_URI:http://localhost:8095/eureka} logging.file=target/${spring.application.name}.log |
Şimdi ise restful servisimizin endpointi olan sınıfı yazıyoruz. gerekli açıklamalar yorum satırı olarak eklidir.
ProductController.java
|
1 2 3 4 5 6 7 8 9 10 11 12 13 14 15 16 17 18 19 20 21 22 23 24 25 26 27 28 29 30 31 |
package io.bilisim.controller; import javax.ws.rs.Consumes; import javax.ws.rs.Produces; import javax.ws.rs.core.MediaType; import org.springframework.web.bind.annotation.RequestMapping; import org.springframework.web.bind.annotation.RequestMethod; import org.springframework.web.bind.annotation.RestController; /** * bilisim.io * mkilic */ //restful servis için entpointimizi belirtiyoruz. @RestController public class ProductController { @RequestMapping(value = "/test", method = RequestMethod.GET) @Consumes({ MediaType.APPLICATION_JSON, MediaType.TEXT_PLAIN, MediaType.APPLICATION_XML }) @Produces({ MediaType.APPLICATION_JSON, MediaType.TEXT_PLAIN, MediaType.APPLICATION_XML }) public String testService() { //biraz önce belirttimiz gibi ilk build ettiğimizde //bu şekilde edeceğiz sonrasında ise (return "Product Service 2";) //olarak build edeceğiz. return "Product Service 1"; } } |
Sonrasında ise projemiziin çalışması için gerekli main sınıfımızı yazıyoruz.
Application.java
|
1 2 3 4 5 6 7 8 9 10 11 12 13 14 15 16 17 18 19 20 21 22 23 24 |
package io.bilisim; import org.springframework.boot.SpringApplication; import org.springframework.boot.autoconfigure.SpringBootApplication; import org.springframework.cloud.client.discovery.EnableDiscoveryClient; import org.springframework.cloud.netflix.eureka.EnableEurekaClient; /** * bilisim.io * */ @EnableEurekaClient //Eureka server 'a register olabilmesi için bu notasyonu ekliyoruz. @EnableDiscoveryClient //springboot projesi @SpringBootApplication public class Application { public static void main( String[] args ) { SpringApplication.run(Application.class, args); } } |
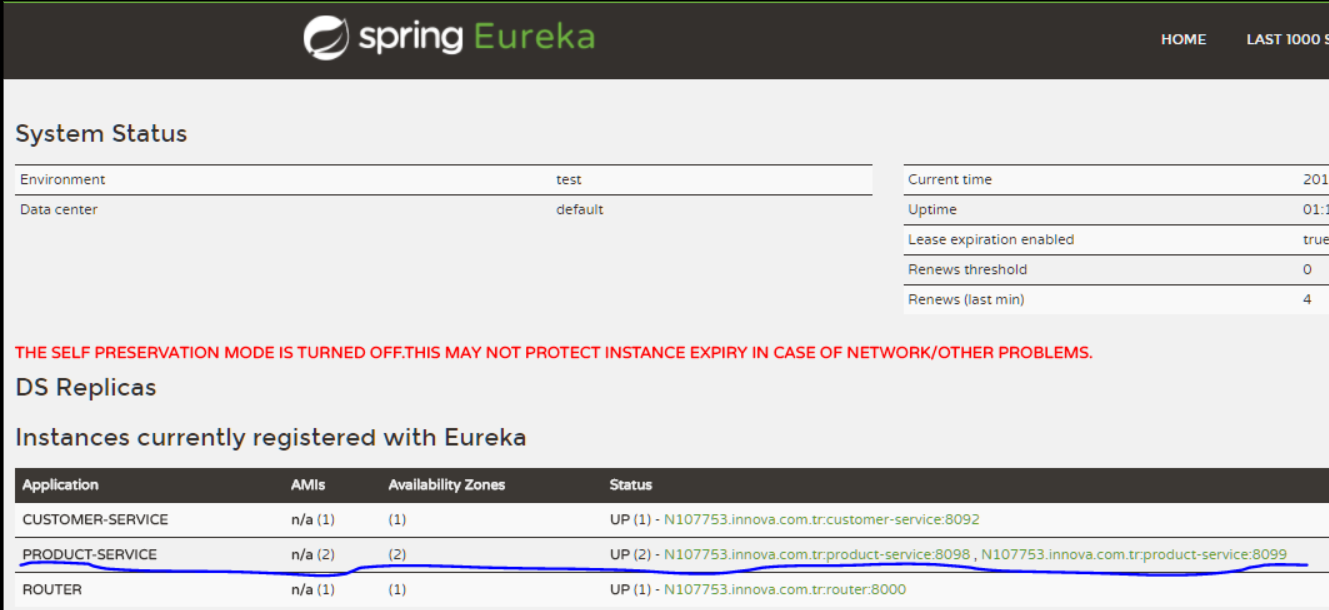
Servisimizi ilk servisimiz gibi çalıştırabilirsiniz. Servisimizi çalıştırdığımızda eureka server ekranına register olmuşmu diye bakabiliriz. Servis ismi ile register olacağından ekranda product-service olarak görmemiz lazım.
Çıktısı:

Şimdi ise register olması için cutomer-service yazalım aynı şekilde maven projesi olacak.
pom.xml
|
1 2 3 4 5 6 7 8 9 10 11 12 13 14 15 16 17 18 19 20 21 22 23 24 25 26 27 28 29 30 31 32 33 34 35 36 37 38 39 40 41 42 43 44 45 46 47 48 49 50 51 52 53 |
<project xmlns="http://maven.apache.org/POM/4.0.0" xmlns:xsi="http://www.w3.org/2001/XMLSchema-instance" xsi:schemaLocation="http://maven.apache.org/POM/4.0.0 http://maven.apache.org/xsd/maven-4.0.0.xsd"> <modelVersion>4.0.0</modelVersion> <groupId>io</groupId> <artifactId>customer-service</artifactId> <version>0.0.1-SNAPSHOT</version> <packaging>jar</packaging> <name>customer-service</name> <url>http://maven.apache.org</url> <properties> <project.build.sourceEncoding>UTF-8</project.build.sourceEncoding> </properties> <parent> <groupId>org.springframework.boot</groupId> <artifactId>spring-boot-starter-parent</artifactId> <version>1.5.4.RELEASE</version> <relativePath /> <!-- lookup parent from repository --> </parent> <dependencies> <dependency> <groupId>org.springframework.cloud</groupId> <artifactId>spring-cloud-starter-eureka</artifactId> </dependency> <dependency> <groupId>org.springframework.boot</groupId> <artifactId>spring-boot-starter-web</artifactId> </dependency> <dependency> <groupId>org.springframework.boot</groupId> <artifactId>spring-boot-starter-test</artifactId> <scope>test</scope> </dependency> </dependencies> <dependencyManagement> <dependencies> <dependency> <groupId>org.springframework.cloud</groupId> <artifactId>spring-cloud-dependencies</artifactId> <version>Dalston.SR1</version> <type>pom</type> <scope>import</scope> </dependency> </dependencies> </dependencyManagement> </project> |
servis ayağa kalabilmesi için property elrin olduğu dosyası ekleyelim resources dosyasına
application.properties
|
1 2 3 4 5 6 7 8 |
#Unutmayalim servisimiz servis ismi ile register service #register olacaktir spring.application.name=customer-service #servis portumuzu yaziyoruz server.port=8092 #Register olabilmeiz için eureka url'imizi veriyoruz. eureka.client.serviceUrl.defaultZone=${EUREKA_URI:http://localhost:8095/eureka} logging.file=target/${spring.application.name}.log |
Servisimizin ayağa kalkması için main sınıfımızı yazalım.
Application.java
|
1 2 3 4 5 6 7 8 9 10 11 12 13 14 15 16 17 18 19 20 21 22 23 |
package io.bilisim; import org.springframework.boot.SpringApplication; import org.springframework.boot.autoconfigure.SpringBootApplication; import org.springframework.cloud.client.discovery.EnableDiscoveryClient; /** * bilisim.io * mkilic */ //Eureka server 'a register olabilmesi için bu notasyonu ekliyoruz. @EnableDiscoveryClient //springboot projesi @SpringBootApplication public class Application { public static void main( String[] args ) { SpringApplication.run(Application.class, args); } } |
Servisi ayağa kaldırdığımızda eureka server ekranına baktığımızda servisin register olduğunu görmeliyiz.

Çıktısındada göründüğü gibi iki servisimizde register olmuş .
Şimdi ise bahsettiğimiz load balancing testimizi yapabilmemiz için router-service ‘imizi yazalım.
ilk önce maven projesi açıyoruz. Proje bağımlılıklarımızı ekliyoruz.
pom.xml
|
1 2 3 4 5 6 7 8 9 10 11 12 13 14 15 16 17 18 19 20 21 22 23 24 25 26 27 28 29 30 31 32 33 34 35 36 37 38 39 40 41 42 43 44 45 46 47 48 49 50 51 52 53 54 55 56 57 58 59 60 61 62 63 64 65 66 67 |
<project xmlns="http://maven.apache.org/POM/4.0.0" xmlns:xsi="http://www.w3.org/2001/XMLSchema-instance" xsi:schemaLocation="http://maven.apache.org/POM/4.0.0 http://maven.apache.org/xsd/maven-4.0.0.xsd"> <modelVersion>4.0.0</modelVersion> <groupId>io</groupId> <artifactId>router</artifactId> <version>0.0.1-SNAPSHOT</version> <packaging>jar</packaging> <name>router</name> <url>http://maven.apache.org</url> <properties> <project.build.sourceEncoding>UTF-8</project.build.sourceEncoding> </properties> <parent> <groupId>org.springframework.boot</groupId> <artifactId>spring-boot-starter-parent</artifactId> <version>1.5.4.RELEASE</version> <relativePath /> <!-- lookup parent from repository --> </parent> <dependencies> <dependency> <groupId>org.springframework.cloud</groupId> <artifactId>spring-cloud-starter-eureka</artifactId> </dependency> <dependency> <groupId>org.springframework.boot</groupId> <artifactId>spring-boot-starter-web</artifactId> </dependency> <dependency> <groupId>org.springframework.cloud</groupId> <artifactId>spring-cloud-starter-zuul</artifactId> </dependency> <dependency> <groupId>org.springframework.boot</groupId> <artifactId>spring-boot-starter-test</artifactId> <scope>test</scope> </dependency> <dependency> <groupId>junit</groupId> <artifactId>junit</artifactId> <version>3.8.1</version> <scope>test</scope> </dependency> </dependencies> <dependencyManagement> <dependencies> <dependency> <groupId>org.springframework.cloud</groupId> <artifactId>spring-cloud-dependencies</artifactId> <version>Dalston.SR1</version> <type>pom</type> <scope>import</scope> </dependency> </dependencies> </dependencyManagement> </project> |
servis ayağa kalabilmesi için property ‘ lerin olduğu dosyası ekleyelim resources dosyasına
application.properties
|
1 2 3 4 |
server.port=8000 spring.application.name=router eureka.client.serviceUrl.defaultZone=${EUREKA_URI:http://localhost:8095/eureka} logging.file=target/${spring.application.name}.log |
daha sonra servisimizi çalıştıracagımız main sınıfımızı ekliyoruz.
Application.java
|
1 2 3 4 5 6 7 8 9 10 11 12 13 14 15 16 17 18 19 20 21 22 23 24 25 |
package io.bilisim; import org.springframework.boot.SpringApplication; import org.springframework.boot.autoconfigure.SpringBootApplication; import org.springframework.cloud.client.discovery.EnableDiscoveryClient; import org.springframework.cloud.netflix.zuul.EnableZuulProxy; /** * bilisim.io *mkilic */ @SpringBootApplication //yük dağılımını bu notasyon ile yapıyoruz @EnableZuulProxy //Eureka server 'a register olabilmesi için bu notasyonu ekliyoruz. @EnableDiscoveryClient public class Application { public static void main( String[] args ) { SpringApplication.run(Application.class, args); } } |
gerekli açıklamalar kod içersinde yorum satırı olarak eklenmiştir.
şimdi ise bu servisimizi çalıştıralım ve eureka server’e register olmuşmu bakalım.
çıktısı:

şimdi ise yük dağılımı yapılıyormu product-service üzerinden test edelim. Bunun için product-service’ten iki tane ayağa kaldırıyoruz. restful servisten response yukarda demiştik birinde olarak “Product Service 1” ikincisinde ise “Product Service 2” dönecektir.
Burada dikkat edilmesi gereken ikinci product-service ‘i ayağa kaldırırken porrunu farklı vermemiz gerekiyor. Aynı isimde register olacakları için bir servisten 2 tane ayağa kalkmış olacaktır. Çıktısı şöyle olacaktır servisi ayağa kaldırdığımızda

Testimize başlamadan önce router’ın çalışma mantığına deyinelim , router servisimizin portu 8000 olarak ayarlamıştık. router üzerinden customer servisimize gideceğiz. İşleyiş şöyledir router aslında sadece bir yönlendiricidir, gider register-service’e derki şu isimle sana register olmuş servis varmı var ise isteğimi ona ilet, mesela customer-service gidelim router üzerinden url şu şekilde olacaktır.
<router-service> : <servis-portu> / <gidilecek servis ismi>
http://localhost:8000/customer-service
yukardaki şekilde router üstünden servisimize ulaştık , şimdi ise product-service’ten iki tane ayağa kaldırmıştık. Yük dağılımı yapıyormu test edelim yani router üzerinden product-service’e gideceğiz ve register-service acaba bize iki serviside dönderiyormu bakalım. Rest servislerimiz bize iki değeride ( “Product Service 1” ve “Product Service 2” ) dönderir ise eğer iki servisede gidiyor demektir. Testi için iki chrome açarak şu linke istek atmanız yeterli
http://localhost:8000/prodcut-service/test
Çıktısı

Umarım yararlı olmuştur.
İyi Çalışmalar


