Java WebService Kullanımı
Merhaba Arkadaşlar ;
– İlk başta bir web projesi açıyoruz.
File –> NewProject –> Java Web –> Web Application
– Sonrasında oluşturduğumuz normal java sınıfımızın başına @WebService notasyonu kouyoruz.
|
1 2 3 4 5 6 7 8 |
package com.turkishh.services; import javax.jws.WebService; @WebService(serviceName = "MyServices") public class MyWebservices { } |
|
1 |
– Notasyona verdiğimiz parametre (serviceName = “MyServices”) client’te webservisimizin gözükeceği isimdir. Bu notasyonumuzu sınıfımıza eklediğimiz anda bize editör uyarı veriyor ve bu kodun derlenebilmesi için en az bir tane webmethod (operation) olması lazım diyor.
|
1 2 3 4 5 6 7 8 9 10 11 12 13 |
package com.turkishh.services; import javax.jws.WebMethod; import javax.jws.WebParam; import javax.jws.WebService; @WebService(serviceName = "MyServices") public class MyWebservices { @WebMethod(operationName = "login") public String login(){ }} |
– Yazdığımız normal bir normal metodu webmethod yapabilmemiz için ( @WebMethod ) notasyonu kullanmamız lazım. (operationName = “login”) webmethod’a yazdığım operationName parametresi client tarafında bizim methodun ismi olarak gözükür.
|
1 2 3 4 5 6 7 8 9 10 11 12 13 14 15 16 17 18 19 20 |
package com.turkishh.services; import javax.jws.WebMethod; import javax.jws.WebParam; import javax.jws.WebService; /** * * @author www.turkishh.com */ @WebService(serviceName = "MyServices") public class MyWebservices { @WebMethod(operationName = "login") public String login(@WebParam(name = "userName") String userName, @WebParam(name = "password") String password) { return null; } } |
Bundan sonrası methodumuza parametre eklemek (@WebParam(name = “adi”) String adi, @WebParam(name = “soyadi”) String soyadi) Bu notasyonları yazmasakta clientte gözükür ama “args” olarak gözükür.
|
1 2 3 4 5 6 7 8 9 10 11 12 13 14 15 16 17 18 19 20 |
package com.turkishh.services; import javax.jws.WebMethod; import javax.jws.WebParam; import javax.jws.WebService; /** * * @author www.turkishh.com */ @WebService(serviceName = "MyServices") public class MyWebservices { @WebMethod(operationName = "login") public String login(@WebParam(name = "userName") String userName, @WebParam(name = "password") String password) { if (userName.equals("admin") && password.equals("turkishh")) { return "Hoşgeldiniz : " + userName; } return "Kullanıcı adi veya şifre yanlış"; |
}
}
ve client’te test yapabileceğimiz küçük bir uygulamayı deploy edelim sunucumuza .
Sunucumuza deploy ettikten sonra client tarafta bize lazım olacak adresimiz şu şekilde olacaktır.
http://sunucuadresi:8080/WebServicesExample/MyWebservices?wsdl
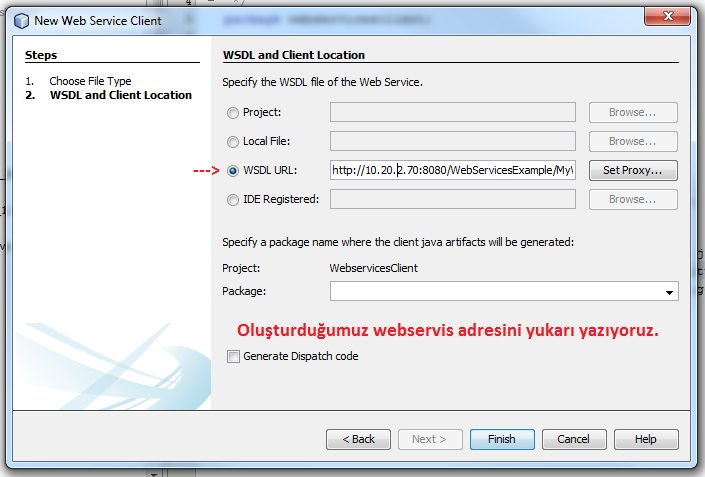
WebService çalışıyormu diye test edelim şimdi küçük bir java projesi oluşturalım ve sağ tıklayıp webservis client ekleyelim.

Gelen ekranda oluşturduğumuz webservis adresini ekleyip bitir diyoruz.
|
1 2 3 |
Sonrasında projemize de <strong>Web Service References</strong> ve <strong>Generated Sources (jax-ws) isiminde iki klasör olusturuyor..</strong> Bu webservisi kullanmak için ise şöyle bir kodlama yapıyoruz . generated edilen sınıfları kullanarak |
|
1 2 3 4 5 6 7 8 9 10 11 12 13 14 15 16 17 18 19 20 21 22 23 24 |
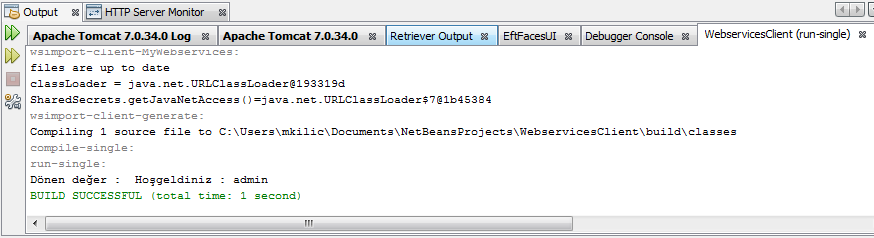
/* * To change this template, choose Tools | Templates * and open the template in the editor. */ package webservicesclient; /** * * @author www.turkishh.com */ public class WebservicesClient { public static void main(String[] args) { System.out.println("Dönen değer : "+login("admin", "turkishh")); } private static String login(java.lang.String userName, java.lang.String password) { com.turkishh.services.MyServices service = new com.turkishh.services.MyServices(); com.turkishh.services.MyWebservices port = service.getMyWebservicesPort(); return port.login(userName, password); } } Run ettiğimizde çıktısı şöyle oluyor : |
Umarım yararlı olmuştur 😉
İyi Çalışmalar